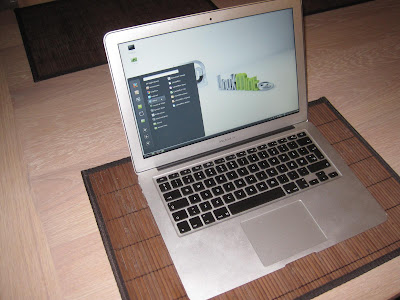
Installing Linux Mint on a Macbook Air
In late 2011 I bought the Apple Macbook Air 13" (model 4,2 with 128GB SSD) to replace my aging road-warrior Dell 420. As much as I was impressed by Apple's hardware and the Macbook Air in particular, I was never taken by their software or the OSX that comes with the Macbook Air when you buy it. So within a week or so, I started experimenting putting Ubuntu (my then favorite OS) onto it. Things may have improved by then, but it was quite a task to get Ubuntu installed and set up properly - much more difficult than setting up Linux on a non-Apple laptop. The end result was a functioning but fragile setup, where each update to Ubuntu (new kernel in particular) would require me to reboot into safe mode and manually edit various files. As chef Ramsay would say, what a f...... nightmare.
After 1 1/2 year and a dangerously outdated system (so many Java vulnerabilities), I decided it was time for a re-install. This time around however, I chose to try out the new favorite kid on the block, namely Linux Mint 14 with the Cinnamon interface (Unity on Ubuntu was OK, but at the end of the day more limiting than facilitating). I did prepare myself mentally for having to go through a week of cursing and sweating, but as it would turn out these concerns were entirely unfounded.


While still in OSX, I then downloaded the Mint 14 image I wanted as an ISO file.
Part of the trouble with the Macbook Air, is that it does not readily boot from an optical drive and it uses UEFI rather than your traditional BIOS. So one has to use a USB stick that talks UEFI, or install Windows via bootcamp (special Apple support for dual-booting Windows and OSX) and piggyback off this partition. Last time I installed Ubuntu, I used the latter method, but this time around I wanted to give the former approach a try - Windows takes an enormous amount of space after all, and I already have OSX eating up precious space. It turns out that it is pretty easy now days, I simply downloaded an application for OSX called Penguintosh specifically made for he purpose, used the tool to write my Mint image to a USB device and rebooted. While booting up, hold down the C key, so that you get to choose which device to boot from. Select the last orange USB icon and double click it.

Soon you should have a Mint live image running. From within this live image, it's trivial to start installing Linux Mint to disk, since you already prepared the partition. Once installed, GRUB will give you the option of booting into Mint or OSX.


In the same category, you may also want to change the scroll direction to match what you have been used to in OSX (I am now used to this inverse "natural scroll"). Once again, this is an xorg setting that you can also invoke on-demand:
Another little detail I did not like, was how function (fn) keys were default over the classic F (F1-F12) keys - as a developer I rather depend on these and would prefer to control sound, brightness etc. with a combo using the fn keys. To change this, create a file in the path "/etc/modprobe.d/hid_apple.conf" with the content "options hid_apple fnmode=2".
Strangely, Cinnamon does not (yet) have any way to organize Linux groups, but you can just use the classic Gnome tools for this, by installing:
Then of course, there are all the applications. One of the first things I install is usually the handy plugin to Nautilus (yes it also works in Linux Mint's Nemo fork of Nautilus) which allows for image resizing directly while navigating your files:
Naturally, if you have tips or tweaks in this regard, feel free to drop a comment about it below. :)
After 1 1/2 year and a dangerously outdated system (so many Java vulnerabilities), I decided it was time for a re-install. This time around however, I chose to try out the new favorite kid on the block, namely Linux Mint 14 with the Cinnamon interface (Unity on Ubuntu was OK, but at the end of the day more limiting than facilitating). I did prepare myself mentally for having to go through a week of cursing and sweating, but as it would turn out these concerns were entirely unfounded.

Installation procedure
First I booted back into OSX recovery (Command-R during boot) so that I could re-install OSX such as to have a completely fresh system and up-to-date firmware. The restore functionality build into the Apple hardware works very well, and remains a solid advantage to that OS - if only it was possible to provide alternative OS images this would be a killer feature. Anyway, after re-installing OSX I then wanted to re-partition to get some space for Linux. However, it turned out that you are not allowed to commit these actions in the recovery (at least I kept getting an error message) so I had to do it from the DiskUtil while booted normally into OSX. In here, I shrunk the OSX partition down to around 25GB, leaving just 2-3 GB of free space on OSX and a good 95GB for Linux partitions. That way, I could still occasionally boot OSX, but I knew from experience that I would never purposefully use OSX for my daily work. If you plan to actually use OSX from time to time, you should probable give it a bit more space than I did.
While still in OSX, I then downloaded the Mint 14 image I wanted as an ISO file.
Part of the trouble with the Macbook Air, is that it does not readily boot from an optical drive and it uses UEFI rather than your traditional BIOS. So one has to use a USB stick that talks UEFI, or install Windows via bootcamp (special Apple support for dual-booting Windows and OSX) and piggyback off this partition. Last time I installed Ubuntu, I used the latter method, but this time around I wanted to give the former approach a try - Windows takes an enormous amount of space after all, and I already have OSX eating up precious space. It turns out that it is pretty easy now days, I simply downloaded an application for OSX called Penguintosh specifically made for he purpose, used the tool to write my Mint image to a USB device and rebooted. While booting up, hold down the C key, so that you get to choose which device to boot from. Select the last orange USB icon and double click it.

Soon you should have a Mint live image running. From within this live image, it's trivial to start installing Linux Mint to disk, since you already prepared the partition. Once installed, GRUB will give you the option of booting into Mint or OSX.

Tweaking Linux Mint
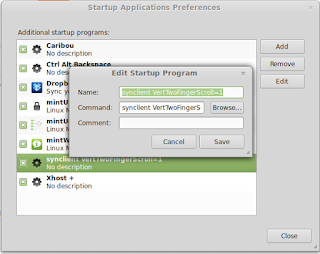
Generally very little tweaking is necessary, in contrast to my experiences with Ubuntu. Screen, sound, trackpad, keyboard backlight, function keys etc. all just seems to work. If however you are not happy with how the trackpad operates, you may tweak it with the synclient utility. For instance, I noticed that two-finger scroll is disabled, but it can be enabled with the command:~$ synclient VertTwoFingerScroll=1You can explore countless settings for the trackpad this way, but it won't be permanent until you modify the xorg settings. I had some trouble succeeding with this the official way (messing with xorg settings file), so I simply ended up adding an entry in Cinnamons "Startup applications" applet.

In the same category, you may also want to change the scroll direction to match what you have been used to in OSX (I am now used to this inverse "natural scroll"). Once again, this is an xorg setting that you can also invoke on-demand:
~$ xinput set-button-map 11 1 2 3 5 4 6 7 8 9 10 11 12As with the previous command, you can just let "Startup applications" handle this by adding "xinput set-button-map 11 1 2 3 5 4 6 7 8 9 10 11 12" as an application.
Another little detail I did not like, was how function (fn) keys were default over the classic F (F1-F12) keys - as a developer I rather depend on these and would prefer to control sound, brightness etc. with a combo using the fn keys. To change this, create a file in the path "/etc/modprobe.d/hid_apple.conf" with the content "options hid_apple fnmode=2".
~$ echo "options hid_apple fnmode=2" > /etc/modprobe.d/hid_apple.conf
Strangely, Cinnamon does not (yet) have any way to organize Linux groups, but you can just use the classic Gnome tools for this, by installing:
~$ sudo apt-get install gnome-system-tools
Then of course, there are all the applications. One of the first things I install is usually the handy plugin to Nautilus (yes it also works in Linux Mint's Nemo fork of Nautilus) which allows for image resizing directly while navigating your files:
~$ sudo apt-get install nautilus-image-converter imagemagick
Conclusion
While still not as easy as installing Linux on your average laptop, this recent experience of installing Linux Mint 14 onto my Macbook Air was a very nice experience compared to all the hoops I had to go through with Ubuntu. I've come to appreciate the responsiveness and functionality of Linux Mint 14 (and it's Cinnamon UI) so much that I also plan to replace Ubuntu with Mint on my main workstation. There may still be tweaks I need to perform, but the out-of-box experience is very usable. The only real problem I've run into, is the lack of VPNC support in the network manager. Installing "network-manager-vpnc-*" has no effect in the Cinnamon interface, so if you want to connect to Cisco VPN networks, you are going to have to do it the old-fashioned way, with a command-line.Naturally, if you have tips or tweaks in this regard, feel free to drop a comment about it below. :)


Comments
The error is:
BusyBox v1.19.3 (Ubuntu 1:1.19.3-7ubuntu1) built-in shell (ash)
Enter 'help' for a list of built-in commands.
(initramfs)
Could not find the ISO /efi/boot/boot.iso
This could also happen if the file system is not clean because of an operating system crash, an interrupted boot process, an improper shutdown, or unplugging of a removable device without first unmounting or ejecting it. To fix this, simply reboot into Windows, let it fully start, log in, run 'chkdsk /r', then gracefully shut down and reboot back into Windows. After this you should be able to reboot again and resume the installation.
Any ideas? Thanks.
I have installed mint 15 RC on my MBA 4.2 and I'm having problems with cpu temp (normally around 65ºC but often over 80) and battery life (2h max).
Macfan and TLP ara running, and I did the installation using Refit.
Any idea on how to fix it?
Thanks
- the fan use is extensive even with the cpus down to 800MHz and no demanding application running; not surprisingly as for some reason the cpus are hot
- closing the lid first blanks the screen (as instructed) but in a few second is back on and it stays this way
Funny enough in my case the two finger scrolling worked o-o-box, just needed to activate this option via the control panel.
During the installation of Mint where did you tell Mint to put the boot loader?